Are you looking to supercharge your automation workflows with n8n but don’t want to keep your computer running 24/7 or pay for expensive hosting? This tutorial is for you! We’ll walk you through how to self-host n8n for absolutely free using render for your server and Supabase for your database, ensuring your instance is always online and your data is securely backed up. Say goodbye to local dependencies and hello to reliable, cloud-based automation!
What You’ll Need
- A modern web browser (Google Chrome recommended)
- Render Account
- A GitHub account (optional)
- Supabase Account
Step-by-Step Tutorial
Step 1: Set Up Your n8n Instance on Render
First, we’ll create our n8n web service on Render, a platform that allows you to host web applications for free.
- Open your browser and navigate to render.com.
- Click on “Get started” or sign up using your Google account.
- Once logged in, click on “New” then “Web Service”.
- Select “Existing image”.
- In the “Public Docker Image URL” field, enter the n8n Docker image:
n8nio/n8n:latestThen, click “Connect”.
- Name your instance (e.g., \”my-n8n-instance\” or \”n8n-myname\”). This will be part of your n8n URL.
- Ensure the “Instance Type” is set to “Free” (512 MB RAM, 0.1 CPU). This is perfect for practice, but consider a paid plan for production use.
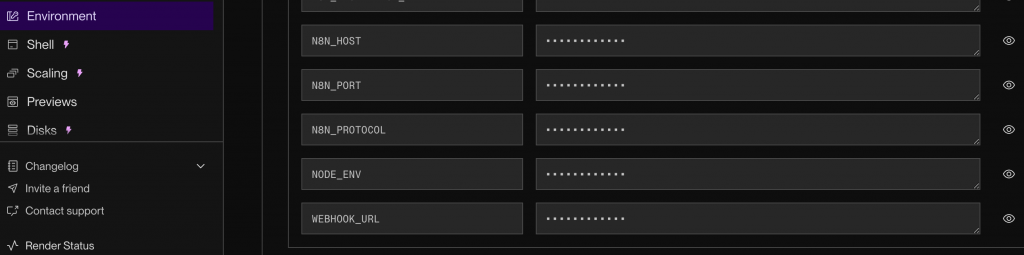
- Scroll down to “Environment Variables” and add the following five variables. Click “Add Environment Variable” for each:

- N8N_HOST: Your Render instance URL (e.g.,
your-instance-name.onrender.com). Replaceyour-instance-namewith the name you gave your instance without http/s. - N8N_PORT:
5678(or your preferred port) - N8N_PROTOCOL:
https - NODE_ENV:
production - WEBHOOK_URL: Your Render instance URL with
https://in front (e.g.,https://your-instance-name.onrender.com)
- N8N_HOST: Your Render instance URL (e.g.,
Step 2: Create a PostgreSQL Database with Supabase
n8n needs a database to store its data. We’ll use Supabase, which offers a free tier for PostgreSQL databases.
- In a new tab, go to supabase.com.
- Click “Start your project” or “Sign Up” and create an account (you can use your Google account).
- After signing up, you’ll be prompted to create a new organization. Give it a name (e.g., \”n8n-organization\”) and select the \”Free\” plan.
- Create a new project. You’ll need to set a strong database password. Make sure to save this password securely, as you’ll need it later. Choose a region close to your Render instance for better performance.
- Once your project is created, click on \”Project that you created\” At the top click \”Connect \”, then Transaction Pooler. We’ll extract parameters from this.
Step 3: Connect Render to Supabase and Deploy n8n
Now, let’s link our n8n instance on Render to our Supabase database.
- Go back to your Render service setup page.
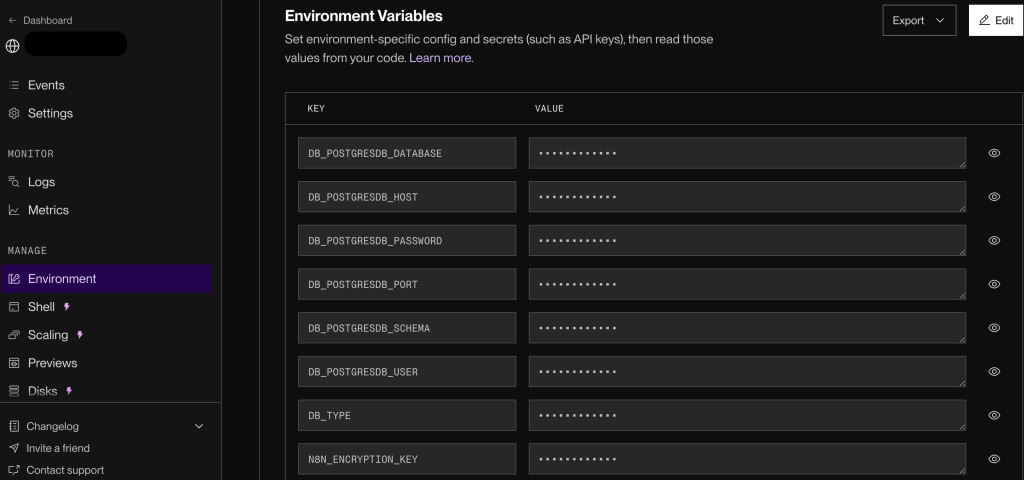
- Under \”Environment Variables\”, add eight more variables. You can find these parameters within the connection string you copied from Supabase under Transaction Pooler. Make sure to replace placeholders with your actual Supabase database details and generate an encryption key.
- DB_POSTGRESDB_DATABASE: (e.g.,
postgresor your database name) - DB_POSTGRESDB_HOST: Your Supabase host from the transaction pooler.
- DB_POSTGRESDB_PASSWORD: The database password you set in Supabase.
- DB_POSTGRESDB_PORT: (e.g., 6543)
- DB_POSTGRESDB_SCHEMA:
public - DB_POSTGRES_USER: (e.g.,
postgresor your username) in supabase transaction pooler. - DB_TYPE:
postgresdb - N8N_ENCRYPTION_KEY: Generate a strong, random key online (search \”encryption key generator\“). Copy and paste it here.
- DB_POSTGRESDB_DATABASE: (e.g.,
- After adding all variables, click “Create Web Service” (or “Deploy Web Service” if you’re editing). This process might take 5-10 minutes.
Step 4: Initial n8n Setup and Licensing
Once your Render service is live, it’s time to set up n8n itself.
- Access your live n8n instance by clicking on the URL provided by Render (e.g.,
https://your-instance-name.onrender.com). - You’ll be prompted to set up your admin account. Enter your email and create a strong password for your n8n login.
- Proceed through the initial setup. n8n will offer a free license key. Click the option to “Get your free license key”. This will send a key to your email.
- Open your email, copy the license key, and paste it into the n8n activation field. Click “Activate”.
Congratulations! Your free, self-hosted n8n instance is now live and ready for use.
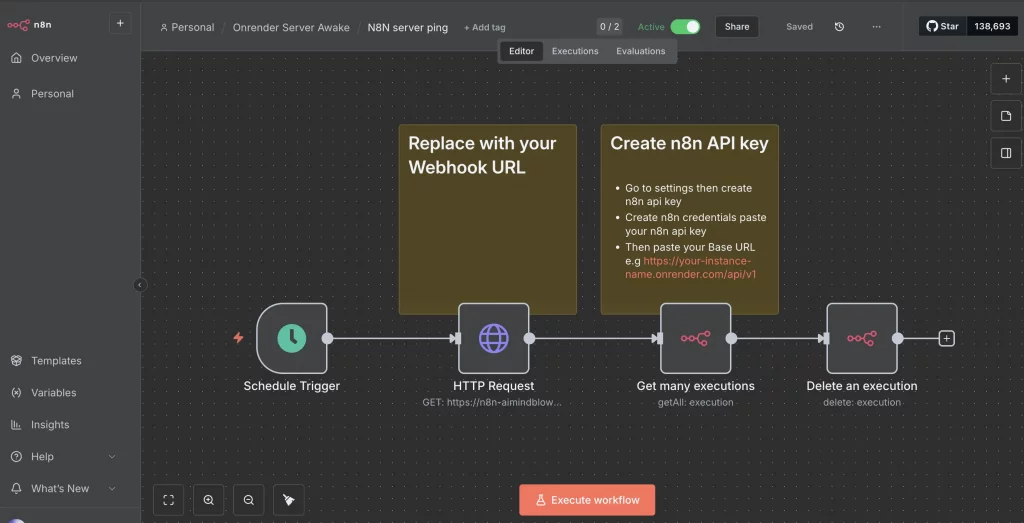
Step 5: Prevent Free Render Instance from Sleeping with Workflow
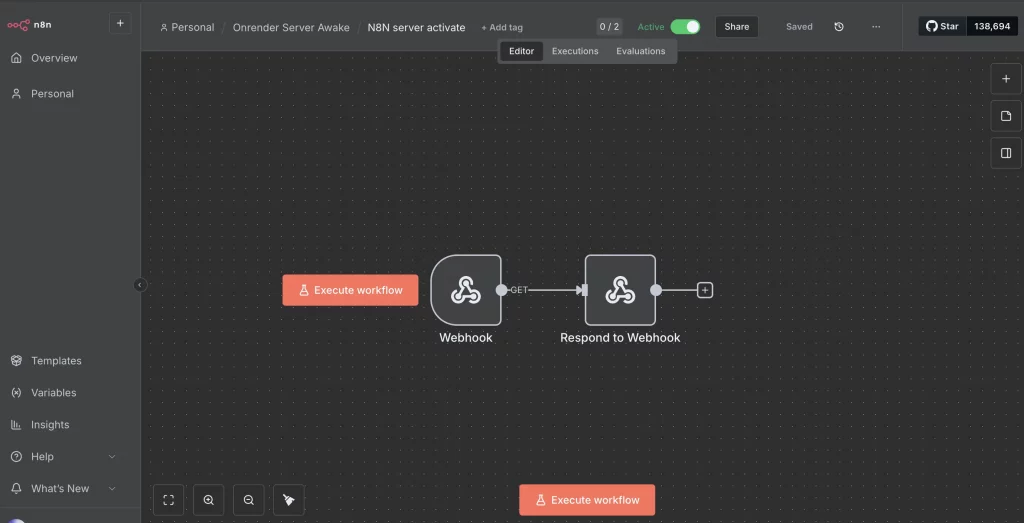
Free Render instances will “spin down” after a period of inactivity. To keep your n8n instance awake 24/7, we’ll use a free n8n workflows.
- Go to your n8n create two workflow.
- Once logged in, click “New Workflow”.
- Select webhook node (in Respond field select “Using Respond to Webhook Node“.
- Then add Respond to Webhook Node (in Respond With field select JSON then in Response Body field you can put json response whatever you like e.g { “health”: “I’m Okay”} then activate workflow .
- Next step Create another workflow.
- Add schedule Trigger Node set to “Every 5 Minutes“.
- Add Http Node set to “GET” paste your Webhook URL in the URL Field
- Optional add n8n Execution Node (get many) set Resource to “Execution” and Operation field to “Get Many” then add filter to “Success”.
- Add n8n Delete Execution Node set Resource to “Execution” then Operation field to “Delete” and Execution ID field paste {{ $json.id }} .
- Create n8n api key Go to Settings create n8n api key.
- Then create new credentials paste your n8n api key and base URL e.g https://your-name.onrender.com/api/v1.
Step 6: Updating Your n8n Instance (Optional)
To keep your n8n instance updated to the latest version, you can manually trigger a redeploy on Render:
- Go to your Render dashboard.
- Select your n8n service.
- Click on the “Manual Deploy” dropdown button.
- Choose either “Deploy latest commit” (if you updated the Docker image reference) or “Restart service”. This will pull the latest n8n Docker image and restart your service.
Pro Tips for Success
- Consider Paid Plans: While the free tier is excellent for learning and personal projects, consider upgrading to a paid plan on Render and Supabase if you plan to use n8n for critical business operations, as paid plans offer more resources and reliability.
- Secure Your Credentials: Always use strong, unique passwords and keep your encryption keys and database credentials secure.
- Community Support: Join the n8n community forums or other technical communities for support and to learn new automation strategies.
Conclusion
You’ve successfully set up a free, self-hosted n8n instance on Render with a persistent Supabase database, ensuring it’s always online by creating own workflow inside your n8n. This powerful setup allows you to build and run complex automation workflows without the need for a dedicated local machine or recurring hosting fees. Now, go forth and automate to your heart’s content!
Does Google Opal will replace n8n? Read full article.